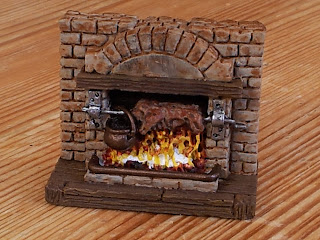
The next piece I'm covering here is the spit roast. A pot hangs from the spit pole and some poor unfortunate beastie is roasting slowly over the fire. Here it is already half finished. The wooden floor and mantlepiece is painted the same as the front door from my previous blog page (burnt umber basecoat drybrushed with light leather brown). But I used a slightly different technique for the stone wall. I painted the basecoat to cover the entire wall, even painting into the cracks of the wall (like I told you not to on the previous post!). I used a light grey (anita's dove grey) as the basecoat. Then I used a brown ink wash over the top, which had a double effect - 1) it makes the surface of the stones look weathered and worn (nice) and 2) if you're careful with how you run the ink onto the piece from your brush, you can get it to 'well' in the mortar joints, darkening them down. To finish off with, I drybrushed a bit of black over the centre 'arch' section above the hearth to make it look a bit sooty. I quite like the look of the finished effect. The roasting pig/creature/giant rat I basecoated in a mid brown (vallejo beasty brown/GW bestial brown) and then drybrushed with a glossy finish nondescript slightly deeper brown I've had lying around for ages to give it that shiny, cooked look. The pot and the hearthrail are painted in tinny tin (GW tin bitz)
I've only recently started trying to paint fire, and I got some tips off an old painting buddy (if you're interested in warhammer 40k model painting of an UNBELIEVABLY GOOD quality, look him up, eggheadminiatures on facebook).
Right - FIRE! I'm working from a black undercoat as usual, and the first colour to go on is a dark red (this is vallejo gory red (GW red gore). I've left a few gaps in some places to give the flames a bit of depth.
Next colour to go on is orange. This is called orange fire, strangely. It's the vallejo equivalent of GW fiery orange. Note again, I leave some gaps to let some red show through in places.
Next colour to go on is yellow. This is a bright yellow humbrol acrylic I've had lying around for about 15 years (and it's still useable! Gotta love acrylics). Note that some time has passed between the above and below pics and the light has gone from daylight to kitchen lights, hence the change in colour tone of the pic.
and finally, right at the bottom of the flames, I've dabbed in some white in the hottest parts of the fire. I went back over a couple of the ridges with yellow to add a bit of form to the flames. I'm really happy with how this came out. It certainly makes for a very warming effect!


No comments:
Post a Comment