Monday, 29 April 2013

BRANCHING OUT

OK, today I'll show you how I make my trees.  First off, I don't make them entirely from scratch.  I cheat (slightly) in that I use pre-formed armatures from one of the woodland scenics bush/tree kits, for example (http://www.antenocitisworkshop.com/3-7-med-green-decid-trees-6-kt.html) .  In these kits, you get some clump scatter, some fine detail branches, and a load of these things:


These are the plastic armatures that you can make the trees from.  Each of these little things is only an inch or two high, so to make a proper tree at Games Workshop scale, you need to fasten them together.  The tree trunk I'm using here is a length of plastic cut from a fake flower, but you can use anything that is straightish and about the thickness of a pencil.  In fact you could use a pencil.  (Since building this tree I've bought some plastic-coated wire (like very thin coat hanger wire) which I'm going to try out at some stage)

The first thing I needed to do was attach the plastic woodland scenic armatures onto the trunk.  This was a little trickier than I anticipated.  I cut off the ends of the armatures at an angle and superglued them onto the trunk, using sticky tape to hold them in place. I wrapped a few layers of sticky tape around the joins to build them up a bit.

I found that working up from the bottom with the largest branches, and alternating the position of the branches left and right on either side of the trunk made for more realistic looking branch distribution.


Then I used this stuff called flexi-bark texturing paste, which is best described as pva glue with sand in it, but it sets 'thick' a little bit like plaster.  I'm not sure exactly what goes into it, but I buy it in a pot from antenociti. (http://www.antenocitisworkshop.com/green-scene-flexi-bark-tub.html).  You paint it all over the tree and it thickens up the branches and trunk, and gives a rough textured appearance.


Next I built the base.  The base is just a square of hardboard, and I pressed the bottom of the trunk into a blob of air drying clay.  I built up the air drying clay into a root system, and sculpted out some roots until I thought it looked cool.  Then once it was dry I layered on a bit more flexi-bark to blend the trunk into the base, and it looked like this:


The great thing about flexi bark is you can (to a limited degree) bend the plastic armatures into new positions  to make a good looking tree shape.  Once the branches were arranged, then I basecoated the whole thing in (you guessed it) burnt umber, and drybrushed with a sand colour to highlight all the nice texture in the bark.

basecoated

drybrushed
Then I flocked the base.  This is just the same process as previous flocking exercises I've detailed.  I paint on pva glue where I wanted the flocking to go:


Then scatter on the flocking.  This is a mainly dark brown /green scatter to resemble forest undergrowth.


I glued on a few extra bits of detailing (an old fallen branch, some patches of silflor grass clumps) and then moved onto flocking the branches.


Here it is all flocked.  This is the clump scatter that came with the woodland scenics tree kit, but you can buy clump scatter on its own too.  Rather than pva, I used scattergrip glue for the branch clumps - it stays tacky even when it's dried out, so it's much better at gripping this kind of flocking onto branches.  You paint it on the same with a brush, but you leave it for 5 minutes or so to go tacky before you start pressing on the clumps of scatter.

I've only done 3 trees (this was the second) so I'm still improving.  This one has a few too many gaps in the foliage for my liking.  I now try to get more branch armatures onto them.  Once I've had a go at building a tree truly from scratch (using bent wire instread of pre-formed plastic branch armatures) I'll post again so you can see how I got on.  Here's tree three, photographed outdoors for more natural lighting:


This was made using exactly the same process, except I used a piece of 10mm styrofoam for the base, rather than hardboard.

Thursday, 25 April 2013

TANKARD OF GROG PLEASE LANDLORD

We're back with the medieval tavern again today.  I thought I'd cover a couple of the pieces together - the barman/bar and the beer barrels.


Here is the barman polishing a tankard, freshly after a coat of chaos black undercoat.


The wood is all done using the same method I've used before.  Pretty much all of this piece is wood.  Burnt umber basecoat, with a drybrushing of light leather brown.  


After drybrushing the piece, I mixed up some dark greens and purples for basecoating the bottles and bric a brac behind the bar.
 

Here's the finished piece from the front.  All the barrel straps I painted in vallejo gun metal (GW boltgun metal).  Terracotta for the flask/pot, and sand for the sacks, with a brown ink overcoat.  I chose white for the barman's shirt with a nice yellow waistcoat and green cravat.  Fetching. 

I'm not that good at skin yet. I use a basecoat of dwarf skin (GW dwarf flesh) with an overcoat of elf skintone (GW elf flesh).  I left gaps around the ears and eyes and edges of the hands to create a bit of a shading effect.  I wonder if the axe is for emergency firewood cutting or for dealing with adventurers who've downed a bit too much of the black thunder.


"Pina colada my good fellow, and a skinny decaff latte for the lady."..... The barman squints his eyes at you with a withering stare. "It's grog. Or grog. If you're lucky, it won't have any rat in it."


The barrel rack was a bit boring actually.  Mostly wood, again, but the lettering was quite fun to do.  I painted out the plates with white, and then very carefully went back over them again in black, leaving the recesses of the lettering in white to look like chalk.  The barrel wood I inked over with a black ink wash to give the wood a different look from the rest of the furniture.


Here's a low-angle shot of a few of the pieces arranged.  The food prep table is in the foreground, with the cooking ranges and ovens behind to the left. To the back right is the common room hearth and tables.  But I'll do them another day.

Monday, 22 April 2013

ROCKY OUTCROPPING

We'll return to the medieval tavern again later, but I thought I'd break things up a bit and do another terrain piece.  I wanted a small piece of terrain that I could use on my wargaming board to add a bit of tactical variation to the gameplay.  Approached from one side, it was to have some difficult terrain, and a small cliff to be scaled. But approached from the other, a smooth rise to the cliff edge, ideal for a row of archers to hail death and metal down on the approaching hordes.   

The base is 10mm styrofoam, A4 size base, with two smaller pieces of 10mm styrofoam layered up to create a ridge. I angled off the edges with my hotwire cutter, and cast a piece of plaster of paris in my cliff face mould (it comes with the woodland scenics 'rock faces' learning kit http://www.antenocitisworkshop.com/lk951-rock-faces-learning-kit.html). The 'foundations' are completed by pva gluing on some bits of broken up cork.  This is just normal cork from a bottle, peeled apart by hand, and it shreds into beautiful rocky lumps. As long as you glue the smooth outside bit of the cork facing down so it can't be seen, you get very realistic boulders.  I made a line of boulders along the ridge of the plaster of paris rock outcropping, to blend the edge of the join, and then scattered a few boulders around the base of the cliff. I've also pva glued down a scattering of sand (I made this before I bought my fine-ground cork for texturing - sand creates a finer texture, but weighs a bit more). Now it looks like this:


Then once the pva is all completely dry, the next job is to undercoat the whole thing to seal it all together. I didn't use my chaos black spray because the propellant in the spray dissolves the styrofoam and you end up with a cratered moonscape. Not ideal.  This is brush-painted, using an undercoat paint I bought from forgedinblood, an ebay seller I have mentioned on a previous blog page.  He's the one who gives all his scatterpacks evocative names like 'elf havens' and 'orc scrubland'.  His undercoat paint is exactly the same.  This isn't 'dark brown acrylic undercoat' - it's 'bugbear bile'. Go figure. Still, it's a good undercoat, and takes the paint nicely, but slightly less matt than the GW chaos black.


I painted the whole thing with an earth brown basecoat, and painted the rocks and boulders with a mid-grey basecoat, and drybrushed with a light grey to pull out all the details.  Here it is after I'd glued on some mossy scatter and some silflor grass tufts.  These come stuck on a sheet of clear plastic film, and you peel off the ones you want and glue them down with pva as usual. They're quick and easy and make great little reed clumps.


After gluing on the static grass (I made this before I bought my static grass applicator) and some bits of brown lichen for shrubs. I've also added some ground-trailing plants across the outcropping. This is a very fine dark green scatter poured over lines of pva glue painted on with a medium fine brush.


Next I've added some long grass clumps (I'll do a page about making the long grass another time) and a couple more different ground scatters.  I've also glued some leaf scatter onto the bush that's growing up against the outcropping.  I don't use pva glue for this - I use scattergrip.  I can recommend this glue for glueing scatter onto lichen or suchlike.  It is a very tacky glue, and even when it's dried, it stays tacky, so it's ideal for this kind of application.  You paint it onto the bush, and leave it for about 5 minutes for it to start going tacky.  Then you scatter on your leaf scatter, and it grabs it straight away.  You have to treat these pieces with a bit of care - if you brush your hand (or other item) heavily against the bush, or bang the piece hard, the bush will shed leaves.


Here's Frodo and Sam looking out over the edge of the cliff.  Looks far too green to be the Emyn Muil or Mordor, but Sam's still ready for action.


Here's another shot of the piece, taken outdoors under cloudy sunlight. I think the natural light improves the realism.

Wednesday, 17 April 2013

A WARMING GLOW


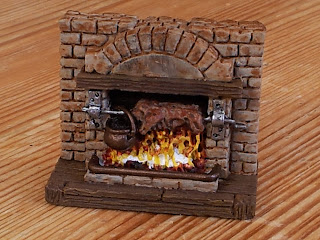
The next piece I'm covering here is the spit roast.  A pot hangs from the spit pole and some poor unfortunate beastie is roasting slowly over the fire.  Here it is already half finished.  The wooden floor and mantlepiece is painted the same as the front door from my previous blog page (burnt umber basecoat drybrushed with light leather brown).  But I used a slightly different technique for the stone wall.  I painted the basecoat to cover the entire wall, even painting into the cracks of the wall (like I told you not to on the previous post!).  I used a light grey (anita's dove grey) as the basecoat. Then I used a brown ink wash over the top, which had a double effect - 1) it makes the surface of the stones look weathered and worn (nice) and 2) if you're careful with how you run the ink onto the piece from your brush, you can get it to 'well' in the mortar joints, darkening them down.  To finish off with, I drybrushed a bit of black over the centre 'arch' section above the hearth to make it look a bit sooty.  I quite like the look of the finished effect.  The roasting pig/creature/giant rat I basecoated in a mid brown (vallejo beasty brown/GW bestial brown) and then drybrushed with a glossy finish nondescript slightly deeper brown I've had lying around for ages to give it that shiny, cooked look.  The pot and the hearthrail are painted in tinny tin (GW tin bitz)

I've only recently started trying to paint fire, and I got some tips off an old painting buddy (if you're interested in warhammer 40k model painting of an UNBELIEVABLY GOOD quality, look him up, eggheadminiatures on facebook).   

Right - FIRE!   I'm working from a black undercoat as usual, and the first colour to go on is a dark red (this is vallejo gory red (GW red gore). I've left a few gaps in some places to give the flames a bit of depth.


Next colour to go on is orange. This is called orange fire, strangely.  It's the vallejo equivalent of GW fiery orange. Note again, I leave some gaps to let some red show through in places.


Next colour to go on is yellow.  This is a bright yellow humbrol acrylic I've had lying around for about 15 years (and it's still useable! Gotta love acrylics).  Note that some time has passed between the above and below pics and the light has gone from daylight to kitchen lights, hence the change in colour tone of the pic.


and finally, right at the bottom of the flames, I've dabbed in some white in the hottest parts of the fire.  I went back over a couple of the ridges with yellow to add a bit of form to the flames. I'm really happy with how this came out.  It certainly makes for a very warming effect!


Tuesday, 16 April 2013

THE TAVERN DOORS OPEN

I put up a pic a couple of posts back of some pieces I bought to make up a medieval tavern. Here's some more of the pieces, all undercoated:

ranges and ovens for the kitchen

Front door, spit roast and ovens again

Beer barrels, bar and barkeep, food prep table and an open hearth

Close up of barman polishing a tankard

They're really great little pieces, full of detail and character.  Before I begin a piece, I spend a good while examining it, looking at all the detail, thinking about what things are made of and how best to paint them. 

I started with the front door.  My basic formula for painting pieces like these goes like this:
1. Examine the piece - trim and file any loose bits of plastic or metal, file down the seams, and generally tidy up any minor casting flaws (even well-cast figures can have a bit of seam showing or spurious flashing that needs trimming off)
2. Spray undercoat in chaos black. This is the games workshop spray undercoat, and gives a very nice, matt black finish that takes my acrylics very well.  Note though: do NOT use it on styrofoam - I tried this once, and the propellant melts the foam. What was going to be a nice grassy hill became something more like a cratered moonscape.
3. Put base colours on.
4. Drybrush any drybrush colours on.
5. Ink in any lowlights
6. Paint detailing and highlights.

Sometimes I change the order, depending on the piece.  I always try to paint the deepest parts of the figure first, so any blobbing onto other parts I can cover up when I come to paint the bit I've accidentally blobbed onto.

(It's practically identical for painting figures, but for figures I do a: 1b. glue on the basing texturing.)

The majority of my paints are vallejo game color pots.  They're designed to be exact colour matches for the Games Workshop range of model colours. And they're cheaper. And I like the dripper top dispensers.  And I read on a forum somewhere that the vallejo acrylics don't wreck your brushes as quickly as the GW ones.  So if you were wondering why I use vallejo and not games workshop paints, that's why.

 I use a burnt umber brown for the wood base coat. The Vallejo
game range calls it 'charred brown' which is a rip-off of games
workshop's 'scorched brown'.  I went a bit out of order next -
I loved the 'Wanted Bad Ass Crew' poster so much I
concentrated on detailing that before I'd put the basecoat
on the stone walls and flagging. Well, they're my rules so I
can break them if I like. They're more like guidelines, anyway...
Base coat for stones done (terracotta) and drybrush for the wood. I drybrush
wood with a leather brown which brings out th grain nicely.
(cobra leather in vallejo, snakebite leather in GW) I take care to
make sure I leave the mortar joints recesses unpainted between
 the stones on the wall. Same with the lettering on the name banner
and the cracks in the plaster.
As long as you don't have too much paint on your brush, it's
not too hard to brush up to the edge of the recess, leaving
the dip unpainted.
And here's the finished front. The stones I've drybrushed with a light grey
(anita's dove grey) and I added a bit of flocking along
the bottom edge of the wall and across the top of the door to make it
feel a bit 'grown in'.  The stone flags have a mid-grey basecoat
(I used anita's acrylic charcoal grey) and then drybrushed on
the highlights with a light grey (anita's dove grey)
The reverse side. I used a brown ink over the top of the
light green curtains to make them look old and dirty.
Gun metal  is a dull silver vallejo colour (boltgun metal GW)
that I used on all the hinges/handles/latch/curtain rings.
Next time - FIRE!

Wednesday, 10 April 2013

THE SCHOOL PROJECT... PART 2

Boy 2 goes back to school tomorrow, so it has been all hands to the deck to get Helvellyn finished.

halfway through hotwire cutting out the contours

all contours done - next job glueing

All glued last night, and the glue was dry enough to paint it at lunchtime today.
I've had to cut a few corners to make sure we get it done in time.
It would have been nice to texture and flock it, but I can't see that happening now.

Monday, 8 April 2013

THE SCHOOL PROJECT...

Boy 2, our 8 year old, has been given a project to do over the Easter break.  He has to do a study on a mountain. It could be a picture, a poster, some interesting facts... but no, our little guy has decided he wants to make a model.  Proud dad moment :-)  He knows about Helvellyn (Lake District, UK, 3117 ft) because I've enthused about it, having climbed it a few times. So he's decided he wants a model Helvellyn to take to school at the start of summer term next week.  Time to get out the styrofoam and hot-wire cutter again...

After a bit of googling for source material, I had something to go on...


I printed out an enlarged OS map of the contours for Helvellyn, scaled to fit on one of my 12" square hardboard terrain bases.  Boy 2 then carefully traced each contour line, making sure each one was a complete circuit (it gets a bit tricky under the wording on the map).  Then I followed my previous procedure for transferring the contours onto styrofoam.  Draw round the outermost contour, then carefully cut it off; draw round the next contour, then carefully cut it off; etc, etc.


Below you can see the completed contours 1 and 2 (there are going to be 11 in total on this one!)  -  which introduced another problem.  My styrofoam is 1" thick (25mm).  If I were to make each contour 1" thick, the whole thing would be 11" high.  For a 12" square base, this would be a rather ridiculous vertical stretch.  I couldn't be bothered with doing the maths to get the correct thickness of contours for the base size I'm using, so in the end I just decided to saw each styrofoam block thickness in half (not an easy job to keep it straight with a handsaw) to give each contour a thickness of approx 10-12mm (I did wobble somewhat).  The whole thing should now be only 5 and a half inches high when finished, which is a lot better, but still too high.  However, this is a primary school project, not a to-scale model of the whole lake district... hmmmm.... a to-scale model of the whole lake district.... now there's an idea..... :-)


Friday, 5 April 2013

FLOCK ON...

The time has come to do the bit I enjoy most about building terrain.  The grassing and flocking.

One thing I have never got into, and that's making my own scatter and flock material.  I know some scratch builders would scoff at the fact I buy mine all pre-made and packaged, but hey, making the stuff would bore the pants off me.  I just want to do the fun stuff.  Judging by my collection, scatter is made (I'm guessing) from dyed sawdust, or dyed sponge, chopped up very small, but to be honest, I don't actually care.  I've also got that model-railway favourite, reindeer moss, or lichen. 

A good rule of thumb I always work to is to build the vegetation up in layers, starting at the deepest undergrowth and working up to the top.  I've started with a patchy layer of mainly dark brown scatter, which has got nice bits of organic 'stuff' in it, I find this makes a good ground cover to work up from.  Using pva glue again, I liberally paint random patches where I want this layer to be, and then sprinkle the scatter over the glue, and leave to dry before shaking off the excess onto newspaper and pouring it back in the pack.

I bought a lot of my scatter packs from an ebay seller who crops up from time to time, called forgedinblood. He gives them all evocative names like 'orc scrubland', 'lothlorien', 'old world woods', 'hobbit meadow' and 'emerald elf havens' and it makes me go all misty eyed and want to start throwing money at the screen.

The rest of it comes mainly from antenociti's workshop, which is a good online shop with a wide range of scratchbuilding materials from the major suppliers (woodland scenics, silflor, noch, etc, and they do a limited range of their own brand (decorplus) which is reasonably priced.  Most of the stuff in the foreground of the pic below is forgedinblood stuff, with some antenociti packs in there as well.  If you're vaguely interested in doing any terrain building of your own, go have a rummage through antenociti's scratchbuilding paradise (http://www.antenocitisworkshop.com/), it's very inspiring.  My most recent acquisition is a pack of pre-formed trailing ivy for spreading across ancient ruined walls (and non-ruined, but if I'm making it, you can bet it will probably be ruined).  You can see the rectangular pack peeping out at the back of the table on the far left, just in front of some clump foliage I use for trees.  For the amount you get it costs a *#! fortune, but it looks totally awesome - every little ivy leaf is individually formed. I'm saving it for a particularly spectacular ruin.


Back to the mountain - the layers go on one at a time, same process as the first, with a complete drying time inbetween each.

some 'bramble' scatter (ground up spongey stuff from antenociti)

both pieces together with bramble scatter - and boy #2's homework and spud gun

with the static grass to finish it off.

Since I built this piece, I bought my static grass applicator (the large metal sieve thing - see CONSTRUCTION MATERIALS) which I have yet to try out.  The idea is this - instead of just sprinkling on the static grass like normal scatter (as I have done on this mountain), after you've painted on your pva glue, you tap a small pin nail into the centre of the area you've just glued.  The applicator has an earth wire that clips onto the pin, and a battery inside the handle creates a static charge on the grass in the sieve. Then you shake the grass onto the glue through the sieve, and the static charge makes all the blades of grass stand on end as they land on the pva glue, making it look like the grass is growing up out of the board - like real grass!  I have seen youtube clips of this being done, and it looks amazing.  I'll let you know how I get on once I've had a go with mine....

Another thing I want to do is buy some different lengths of static grass. The stuff I'm using is all the same length and the grass ends up looking like a golf green.  The figures stand nicely on it for wargaming, but it offends my sense of aesthetics. I want the grass to look a little more, well, mountain-y.

Next time - something a little different.  I bought a set of resin-cast pieces to make a medieval tavern diorama which I have recently finished painting, and they look rather good if I do say so myself. Here's some of them just after undercoating:

Thursday, 4 April 2013

MOUNTAIN MARK 1 PART TWO

Mountains made for gaming with never look like real mountains.  You need to have flat areas on which to put the figures, and the steps all occur very sharply to mark out clearly where climb rolls need to be made.

But despite that, I want to make my mountain look as good as it can.  The vertical sections I've decided are exposed rock, so I want to create a rocky texture on these bits.


To do this, I liberally coat all the vertical sections with pva glue and then sprinkle on some texturing talus.  The stuff I've used here is very finely ground-up cork (I get mine from antenociti's workshop - decorplus extrafine cork, £2.75 for a large yoghurt pot sized tub).  It weighs practically nothing but looks like rubble.  Once it's completely dried,  I knock off the excess onto a sheet of newspaper and pour back into the pot for re-use.  

Next, it's time to undercoat.  I've used a dark brown to completely cover the whole piece.


This helps keep the talus adhered to the piece as well as giving me a nice earth brown underlay for the grass and flocking.  Next I undercoat all the vertical sections of exposed rock in a mid grey (this is anita's acrylic, 59ml pot, charcoal grey)


And then to bring out a bit of detail, I drybrush a lighter grey (anita's acrylic again, dove grey) over the top.  If you've not tried drybrushing, it's a great effect that I use all the time to bring out raised/bumpy bits on any piece, scenery or figures.  You dip your paintbrush into the paint, then brush it off again on a piece of scrap newspaper (sounds odd, but go with it)  then you lightly brush the brush over the piece, a small area at a time, and the raised bumps and ridges will pick up flecks of paint whilst leaving the dips and crevices in the darker colour.  You need to be patient, and don't be tempted to leave some paint on the brush to speed things up, you'll only end up painting into the dips and lose the effect.


Here's a close-up of the cliff, basecoast + dry-brushing on the left, just the darker grey basecoat on the right. It's a simple technique, but I find it really brings things to life.  That's the painting complete now - time to add the flocking!  I'll do that on the next post.